Monday, January 30, 2012

STAEDTLER Fimo Giveaway Posting Closed.... Winners Announced Sunday February 5th 2010!

It's time for a Valentines Day Giveaway!


The amazingly generous folks at STAEDTLER have been good enough to supply their design team members with mini product kits for not just one Valentines Giveaway..... BUT THREE!!!!!

For your chance to win one of these three STAEDTLER Fimo kits featuring Fimo polymer clay and a cutter, Fimo air basic, Fimo microwave, and Fimo air basic natural, follow these simple steps.


The winners will be drawn on 
Sunday February 5th 2012, 
and announced in the evening.

Good luck and watch the STAEDTLER Design Teams blogs for some cool Valentines tutorials. The link is in my sidebar to each of the team members blogs.

Sally Hansen's Salon Effects Test

  I found these cool nail polish stickers at the pharmacy downtown on the weekend. They were about $9.00. There are 16 different sized nail sticker inside the pack along with a nail file and a cuticle pusher and a full set of instructions. I thought I would give them a try.


  The package claims they will last up to ten days! I can't wait to find out if they do!


 I used some other Sally Hansen products to enhance the design a bit. I coloured one flower on each nail with some of their insta dri nail polish. I also gave the stickers a couple coats of Sally Hansen's Xtreme wear for good measure. I plan on re applying the clear coat every two days or so.


 Left thumb


Right thumb

They were pretty easy to apply. I cleaned my hands well before applying them and used the buffer stick as they suggest. I even wiped my nails off with some nail polish remover to de-grease them before I applied the nail polish strips. I really like this design because I can add what ever extra colour I want. It was kind of like when I was a kid and got one of those colour it yourself velvet poster and marker kits. It was fun. They had loads of different designs. I'm already on day three and there isn't even a chip yet. I'll add some more pics with dates as the wearing continues so you can see how they hold up.....

So far they're a whole bunch of fun and well worth the money.

*EDIT*

I wanted to add some shots of how these guys are wearing. I'm pretty impressed!
I use my hands and nails constantly to open hundreds of boxes a day and I'm always doing heavy work like picking up heavy wooden skids from a concrete floor. I also do the dishes the old fashioned way. We don't have a dishwasher. We put the dishes in the sink with water and suds and scrub them up and rinse them and dry them with a towel. This doesn't even count the abuse my nails get in the studio, all that clay and paint and wire...... gahhh...... Considering all of this abuse, this nail decorating sticker thingie from Sally Hansen is holding up like a trooper!


I'll keep you posted on their longevity, but I'm probably going to become bored and change them before they actually wear out.

*EDIT # 2*


OK.... I give!
These nails are NOT going to wear out before they grow out.
I can honestly say this is a pretty acceptable nail art option. 
Sally Hansen..... well done!


Bacon Praline Pecan Butter Tarts

 I've been craving these for a while now......
Bacon and pecans just seemed like such a good mix of flavors.

I used this recipe from the Joy of Baking for pecan butter tarts and added my own flair with some candied bacon bits. Here's how I did it.


I lightly buttered a piece of parchment paper and placed it onto a cookie sheet. Get this ready before you make the bacon praline because there won't be time to do it after.


 I diced up some regular bacon and fried it until it was crisp. I soaked up all the bacon fat by placing the cooked bacon onto a few folded up paper towels and then blotted the rest of the fat away by patting with another paper towel.


 I made some caramel by adding some sugar and a wee bit of water to a pot and boiling it until it dissolved and then started to turn light brown. Watch the cooking sugar closely and turn the heat off the instant it starts to turn colour.


 As soon as it turned colour I speedy quick added the reserved bacon bits. I carefully swirled them around to coat them in the sugar.


 Next I added a tsp of good vanilla and stirred it in.


 Work quickly and carefully, this is molten sugar we're dealing with folks. It causes some pretty nasty burns if you don't respect it. Pour the bacon sugar mix onto the buttered parchment and smooth it out so the bacon bits are separated. Let these guys cool off for at least a half hour before you try one.


 I made my dough following the recipe from the joy of baking.


 I made my butter tart filling using the same joy of baking recipe.


 I reserved 24 half pecans for the tops of my tarts and chopped up some pecans to go in my tarts.


 I also chopped up half of my bacon praline.


 I added about a tsp of pecan and bacon praline to each of the tart shells.


 I filled the tart shells with the butter tart filling and baked them up.


 Butter tarts are magical. They rise up while they bake and fall back down when you take them out of the oven. Check to make sure the tart shells are all golden brown before you take them out of the oven.


I finished up each tart by adding a half pecan and a chunk of praline bacon to the top of each tart. 
These guys are pretty yummy. I was expecting the sugar coating to keep the bacon crisp inside the tart. That didn't happen but it wasn't a failure..... as a matter of fact I think it worked out better that way. The pecan bits gave the right amount of crunch and the bacon gave a familiar salty flavour that I think makes the butter tarts more satisfying.

I think we have a pretty successful new recipe here. What do you think? Will you try it?

Saturday, January 28, 2012

Sour Kraut and Sausage Casserole


It's been a good week for food around here. A coworker has been telling me to get my butt to Krug's butcher shop in Tavistock for ages. I finally went this week...... I will definitely be going back often!

So far we've had their London broil.... a pinwheel of beef with a stuffing of another meat.... pork I think. It was fabulous! Portions were pretty big was the only negative I could muster. We broiled them and had them with a deep rich beef and mushroom gravy over mashed. 

The next night we had their smoked pork chops! The whole house smelled of rich smokey bacon and the flavour was so mellow and delicious. These guys are going to be a family favorite. We had them with mashed, and a veg medley of beet roots, Brussels sprouts, carrot, and pineapple.

Today we had the smoked sausage. Again it was delicious...... We are all becoming huge fans.


Ingredients used:

two tbsp of olive oil
two tbsp of butter
one large Spanish onion thinly sliced
five rashers of bacon
twelve medium Brussels sprouts stemmed and quartered
three medium potatoes chopped to be the same size as the quartered sprouts
one jar of sour kraut drained and rinsed
one quarter cup of water
two of Krug's smoked sausage


 In a deep oven safe frying pan that has a lid, saute the bacon and onions in the oil and butter until cooked through. Add the Brussels sprouts and potato bits and stir together.


 drain and rinse the sour kraut and add it to the pan with a bit of water. Stir everything well and make sure to get the good bits from the bottom stirred through.


 Chop the smoked sausage up into bite sized pieces, add them to the pot and stir them in. Pop the lid on and put the whole thing into a 375 F oven for about a half an hour.


 This is what it looked like when I pulled it out of the oven and peeked in. I left it on top of the stove with the lid on to settle for fifteen minutes so we wouldn't have our mouths burnt. It was HOT!!!!


I served it with some of our fresh  homemade bread still warm from the oven.


 For those of you who are local enough to go see these folks.... Do It!!!!
Ask for the candy sausage!!!

You'll be impressed!

Wednesday, January 25, 2012

Easy Daisy Nail Art and Some Thrify Finds

I've got sculpting length nails again. Makes it a little bit easier to work out detailed clay designs. I decided plain red nails were boring and slapped on some turquoise polish. I used my stylus tool to add some white and pink dots and protected everything with a couple clear coats.

I have a heck of a time typing with short nails. My fingers feel stubby and really sausagy. I hit way too many keys at the same time. But it really is much easier to do detailed work like beading or embroidery with little almond shaped nails than it is with my beloved stiletto nails.

sigh.........

how I suffer for my craft.....

;)


I scored these awesome unblemished table linens at our local Sally Anne shop this week. I have been neglecting my thrift store shopping. It was exciting to go and browse through the treasures. I must make a point to go more often. I hope I didn't miss anything.

Monday, January 23, 2012

Conversation Heart Pendant With STAEDTLER Fimo Air for Microwave


Some things you'll need to make this project:

STAEDTLER Fimo Air for Microwave
STAEDTLER Karat soft pastel chalks
Basic jewelry supplies, 32cm of silver coloured chain, eye and head pins, 5mm jump rings.
5mm white satin ribbon enough for a small bow
3 decorative beads for the end of the necklace


tools:
Rolling pin for clay
STAEDTLER heart shaped cutter
Toothpicks
Stylus tool or dull pencil
Baby wipes
Double round nose pliers with cutter
short bristled soft paint brush
Coarse nail file or sand paper
E6000 adhesive


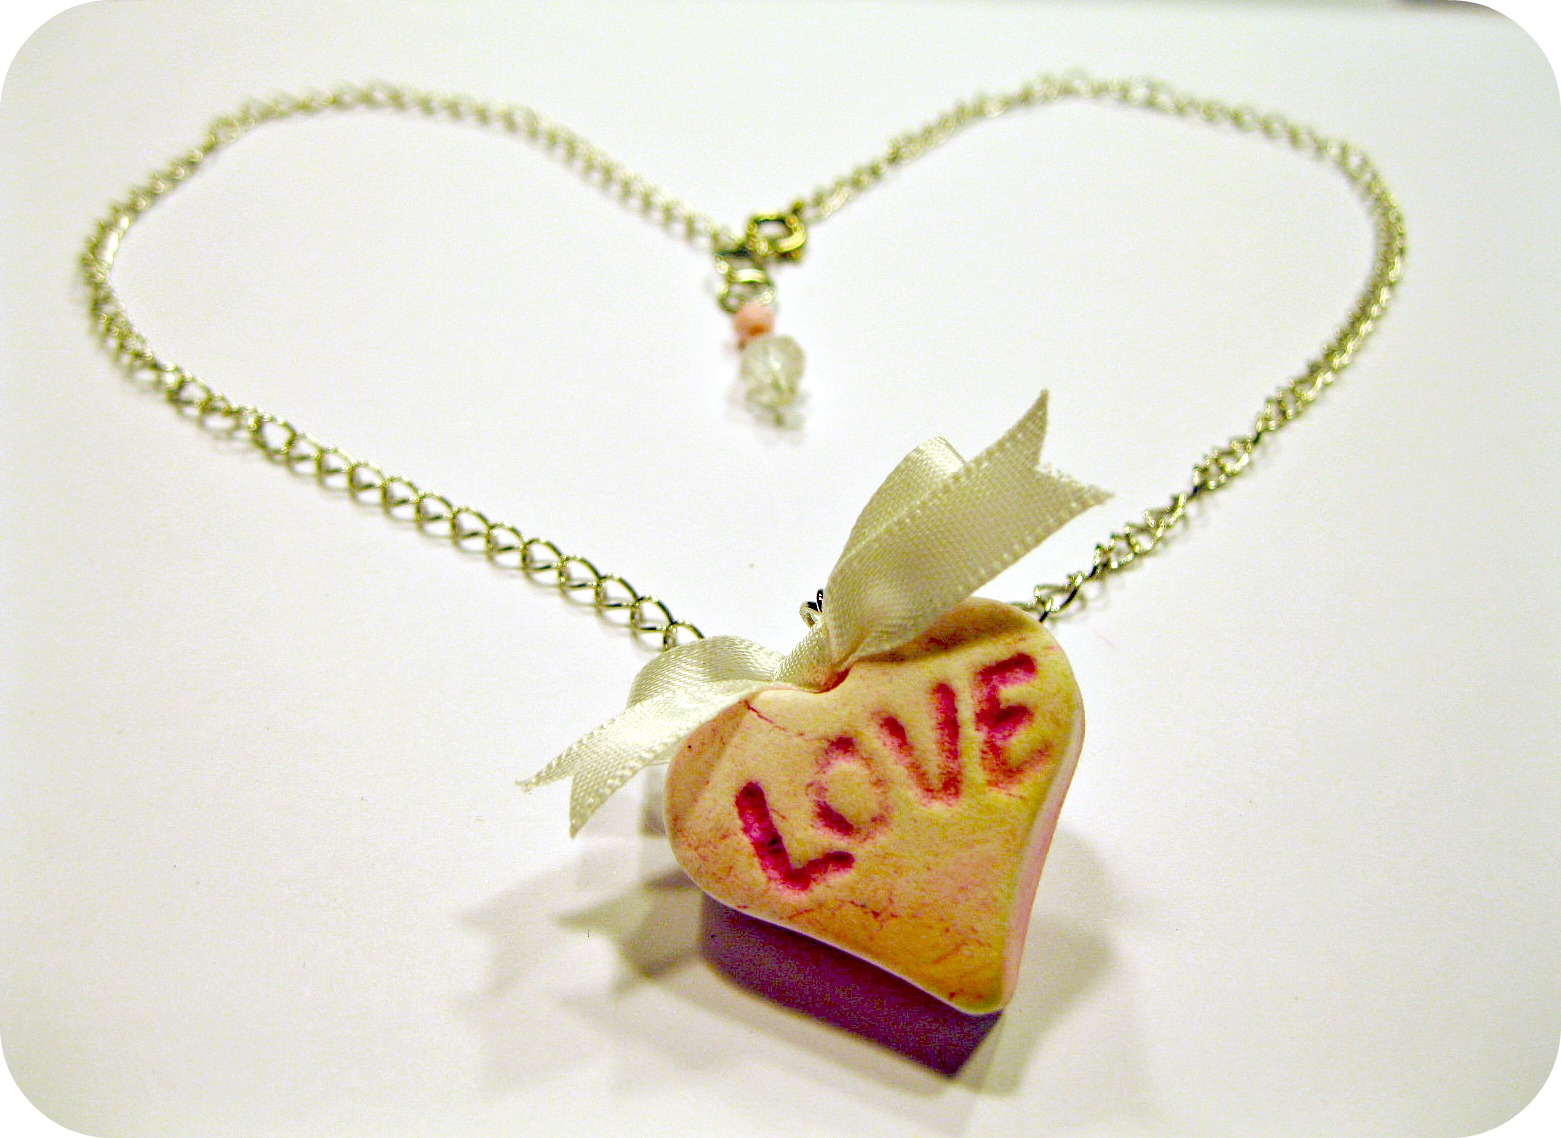
I rolled out the STAEDTLER Fimo Air for Microwave out to 1cm thick and cut out some hearts using my heart cutter.


I made a hole in the centre top of each heart so I could later insert an eye pin for hanging the piece.


Using the stylus tool I wrote some messages onto each heart.


I arranged the hearts onto a paper towel covered plate and put a microwave safe container in the middle half full of water. I put the plate into the microwave for three minutes. I opened the microwave and rearranged the pieces and put them back in for another three minutes. Let the pieces cool in the microwave with the door open. Be careful when you take the plate out of the microwave, the container with water will be very hot and could cause a burn.


I chose some pastel coloured STAEDTLER Karat chalks and rubbed them against a coarse nail file to collect the coloured powder.


With a short bristled soft paintbrush I picked up some of the coloured chalk powder and rubbed it all over the hearts. I made a bunch of them all in different colours.


I used a baby wipe to pull some of the colour from the surface of each heart. Wipes work great for this. They leave just the right amount of colour in the grooves left when I wrote the words on each heart.


Load three focal beads onto a head pin.


Trim the head pin with your wire cutters and turn an eye into the end of the pin with your double round nose pliers.


On one end of the chain I added a clasp and at the other I added three jump rings and then my dangle bead.


Tie a teeny bow around an eye pin.


Glue the eye pin bow piece into the hole at the top of your heart pendant. Add a jump ring and put the pendant onto the chain.


This pendant can be used for a load of cool gifts.


They make light weight earrings, very cool brooches or tie clips, maybe even a cuff link or two? They could also be added to a bookmark. Have fun with this one. I used a 55gr pack of Fimo air for microwave and made a total of 18 of these pendants.

Saturday, January 21, 2012

French Onion Soup Night

This is our version of french onion soup. It's quick to make and warm and satisfying for a cold winter evening. Hope you like it.

Things you'll need to make french onion soup:

Two large Spanish onions thinly sliced
two cloves of garlic minced
two tbsp of cooking oil
one tbsp of butter
1/4 cup of red wine, your choice but make it drinkable
four cups of beef broth
rusk crisp toast rounds
1/2 cup mozzarella cheese grated
four slices of Munster cheese
salt and pepper to taste


Fry the sliced onions and minced garlic in the oil and butter on medium heat until they get golden brown. This takes time and works best on a lower medium heat. If I try to rush this step I just get burned garlic and onions, and that's not good. So keep the heat low and cook them slow. Trust me it'll be worth it.


Here is the wine we used. It's from Niagara Falls. It's delicious.


Add the wine to the pan to de-glaze it and get all those scrumptious bits off the bottom of the pan and into the flavour of the soup. Cook the onion garlic wine base for a bit to reduce it and cook off the alcohol taste.


Add all four cups of beef broth. We used Campbell's beef broth.


These are the rusk toasts we used, but after all it is just toast.


Put a serving of soup in an oven proof bowl. These little guys came from President's Choice and they are porcelain and have a good opening size for this soup. I like 'em! Plunk a piece of toast right on in there on top of the soup.


Pile some mozzarella shredded cheese and a slice of Munster cheese on top of each toast round.


I put my bowls onto a parchment lined baking tray to make spills easier to clean up. Broil those guys for a few minutes to melt up the cheese and brown the edges a little bit.


They look pretty good huh?


Sorry about the blurry shot I was so excited about getting to eat this soup that my hands were shaking. Remember to let it cool off for a second or two before you dig in. It's hotter than you think.

Hope this helps your cold winter night be a bit cozier.