Some things you'll need to make this project:
STAEDTLER Fimo Air for Microwave
STAEDTLER Karat soft pastel chalks
Basic jewelry supplies, 32cm of silver coloured chain, eye and head pins, 5mm jump rings.
5mm white satin ribbon enough for a small bow
3 decorative beads for the end of the necklace
tools:
Rolling pin for clay
STAEDTLER heart shaped cutter
Toothpicks
Stylus tool or dull pencil
Baby wipes
Double round nose pliers with cutter
short bristled soft paint brush
Coarse nail file or sand paper
E6000 adhesive
I rolled out the STAEDTLER Fimo Air for Microwave out to 1cm thick and cut out some hearts using my heart cutter.
I made a hole in the centre top of each heart so I could later insert an eye pin for hanging the piece.
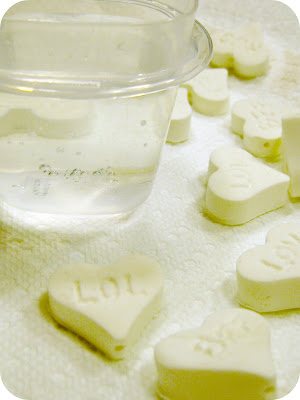
I arranged the hearts onto a paper towel covered plate and put a microwave safe container in the middle half full of water. I put the plate into the microwave for three minutes. I opened the microwave and rearranged the pieces and put them back in for another three minutes. Let the pieces cool in the microwave with the door open. Be careful when you take the plate out of the microwave, the container with water will be very hot and could cause a burn.
I chose some pastel coloured STAEDTLER Karat chalks and rubbed them against a coarse nail file to collect the coloured powder.
With a short bristled soft paintbrush I picked up some of the coloured chalk powder and rubbed it all over the hearts. I made a bunch of them all in different colours.
I used a baby wipe to pull some of the colour from the surface of each heart. Wipes work great for this. They leave just the right amount of colour in the grooves left when I wrote the words on each heart.
Load three focal beads onto a head pin.
Trim the head pin with your wire cutters and turn an eye into the end of the pin with your double round nose pliers.
On one end of the chain I added a clasp and at the other I added three jump rings and then my dangle bead.
Tie a teeny bow around an eye pin.
Glue the eye pin bow piece into the hole at the top of your heart pendant. Add a jump ring and put the pendant onto the chain.


2 comments:
Wow Kellie, this is one great tutorial. You actually answered one of my questions about placing holes in project piece here. Thanks so much. Love how simple this really is and thanks for sharing.
Great tutorial Kellie! I love how you colored them with the chalks and I think my daughter would just adore these!!
Post a Comment