Monday, December 17, 2012

Lots of Missile Toes

 We've stayed busy this weekend playing with STAEDTLER fimo.
We created some missile toe ornaments.
There are so many of these on the interweb that I have no idea who to credit with the original design idea.
Who ever you are..... you're clearly a genius!


I also used some glitter and some craft paints
Grab an eye hook to hang the piece and you're done collecting supplies.


These will make spectacular gifts for those folks who are hard to buy for,
Everyone could use one of these!

Merry Christmas to all of you!!!!

Monday, December 10, 2012

More Shots of the New STAEDTLER Fimo Effect colours

I wanted to be able to show you exactly how cool these new STAEDTLER fimo effect colours are. It's pretty hard to get good shots of they're colour shift capabilities but I think I've come closer with these pictures.


I made some sample chains using my geranium mold. I varnished the back of each cluster to show the glitter and shine inside of each clay bit. The front of each cluster is matte and shows the colour shift without gloss.


So what do you think?
Gorgeous aren't they?
They'll all be available in late 2013.
Some smaller shoppes are featuring the rose quartz and ice blue quartz already.
Hope you're lucky enough to track them down.
You'll be seeing allot more of these soon!

What would you use these delicious new colours for?

Saturday, December 8, 2012

Candy Canes That Won't Melt

Wanted to share how I made these forever candy canes.
I used my favorite STAEDTLER fimo.
These can go outside on wreaths and never get sticky. They're great for centerpieces and garlands too.
Make mini ones to wear as jewelry or to add to scrapbook pages and cards.
They're fun and easy enough for the kids to help.


Grab the following items to make about five candy canes:

Cutting blade for clay
Parchment paper for baking
gloves to keep white clay white


I always start with the lightest colours first. I rolled the white clay into a 1cm thick worm and then made a 1/2cm thick worm of both the mint and then the red clays. I changed my gloves after handling the red clay.


I pressed two red and one mint worm onto the sides of a white worm and rolled it slightly on my work surface. (I protected my work surface with a sheet of baking parchment.)  I began to twist the new multicoloured worm to swirl the colours into a candy cane pattern.


I cut the worm into 5cm lenghts. The worm was about 2cm thick.


I rolled each 5cm worm onto my work surface until they were one cm thick again. I tapered one end to a point and made sure to keep the twist in the candy cane pattern as I rolled.


I curled up the end that I pointed so It looked like a little festive snail shell.


I made a cane shape and baked the candy canes in a preheated 230 degree oven for twenty minutes on a piece of baking parchment.

I really love these colours but I think next time I'll experiment with silver and gold and lime-green additions.
Hope your having a great season so far!


Sunday, December 2, 2012

STAEDTLER Fimo Bon Bons


I made some Bon Bons from STAEDTLER fimo a while back and wanted to share how I made them with anyone who might need some pretend candy lying around. Beware though.... these look delicious and I had more than one passer by try to eat them. I glued mine firmly to the paper and glued the paper into the box so there would be no scarfing of the very real looking clay chocolates.


I used a core of Styrofoam wrapped in a sealed sheet of tin foil as a base. It's very important that the Styrofoam never touches the clay directly. It's also important not to overheat the Styrofoam core. When Styrofoam is overheated, toxic fumes are created. Please ventilate well and watch both your baking time and temperatures. I'm not too worried about under baking the clay because it's being glued into the package and won't be handled very much.


I made a bunch of different shapes. some are wine corks cut in half and covered in tin foil. If you're worried about the fumes it might be advisable to use scrunched up tinfoil as a core instead of the foam. It's a bit harder to shape but might do the trick more safely. Maybe a core of STAEDTLER fimo air dry clay would work. Make sure every shape is covered completely and the surfaces are a smooth as possible.


Make a flat sheet approximately 1/16 inch thick, of whatever brown chocolaty coloured clay you'd like. I used STAEDTLER fimo soft #75 chocolate. Cover the top of each shape with the sheet of clay and smooth the clay eliminating any trapped air between the shapes and the clay.


Make another sheet if clay and place each shape onto the sheet cutting around the shapes to create a bottom. Smooth the seam where the two clay sheets meet with your finger tips.


I used a wet wipe to get rid of any seams and finger prints.


I made a curly worm of clay for the top of this candy. After the candies are all smooth and look the way you want them to look. Bake them in a preheated 220 degree oven for only 15 minutes. Remember not to over heat or overcook these if you are using a Styrofoam core. The fumes are toxic! Watch your time closely and use an oven thermometer to make sure you don't go over temp.


This candy got a worm made of STAEDTLER fimo soft #70 sahara. It really does look like white chocolate.


This bon bon is made using STAEDTLER fimo soft colour #7 caramel with a worm of #75 chocolate on top.


Some of the candies got a worm of clay before I wrapped them in their mock chocolate sheet. This gave texture without that icing look.


They really do look like delicious bon bons.


What do you think? Believable?


Wednesday, November 28, 2012

STAEDTLER Fimo Effect New Colour Sneak Peak

I've been a lucky girl!
I've been sent some of the new colours from
STAEDTLER's fimo effect line to preview. They won't be available until late 2013 but I just had to share them. I'm in love with these yummy new pastels with a translucent base and a metallic shimmer.
.

I took these pics in the evening with very little light. I might have rushed things a bit but I was eager to show these new colours off! I'll take more shots soon and share them as I get them.

I've glossed over the beaks of each owl so you can see how the clays react to glossy coatings and matte finishes alike.

has a beautiful iridescent colour shift floating in an almost periwinkle coloured clay.


is really a believable chilly icy colour when cured.
It's hard to believe something that starts out almost chalky will cure to such a gorgeous translucent shimmer.
I've tested this colour before HERE.


is a fresh clear sunshine yellow with a pearl colour shift.


wow! This is probably my very favorite.
This colour cures into a stunningly beautiful translucent mid green with a gold colour shift.
I'll be using this one heaps.


is so very delicate looking. 
The translucent pink base reminds me of flower petals that let the light filter through them. 
This clay has a pearl shimmer throughout.


is delicious. 
It's a deep red translucent clay with an iridescent shimmer peeking through it.


is a showstopper.
When cured it turns a deep blue black and somehow lets the glitter and shimmer of thousands of stars gleam through.

I'll be doing more colour test shots over the next few weeks to show the depth of colour these new clays have. Stay tuned for more details and more pictures.
Now I just need some sun!

Saturday, November 24, 2012

Here Comes the Snow and More Glitter.

Thought I'd share some of what was going on today!

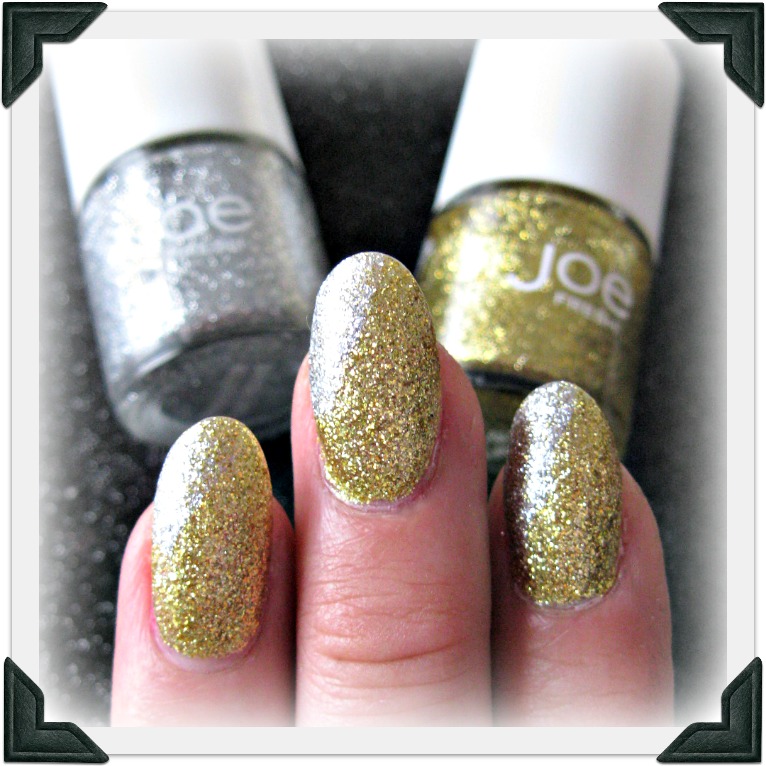
Here is a quick pic of the new glitter polish by Joe Fresh!
This is only two coats of gold glitter and a brush stroke of silver across the left corner of each nail.
I'm in love with these glitters. They are almost opaque with one coat!


We were hit with the wand of the snow fairy today for the first real covering of the year.


It's so pretty!
Making me wanna decorate.
Do you have any seasonal merriness up yet?
Tuesday, November 20, 2012

Plain Gel Nails

I've posted on my techniques for acrylic nail building but haven't done much show and tell with the gels. I thought I'd share how I do my basic gel application using tips.
Hope this answers some of your questions.


This is what I start with. Clean, trimmed nails that have been slightly scuffed. 
It's not pretty folks.


Here is my bruised thumb. I got it stuck in the automatic doors at work last month. There hasn't been any damage or de-formalities on the nail. Just the underneath bruise.


I fit all the tips to my nails and lay them out on a clean surface in order of appearance.


I base coated my nails with some bonder and stuck them in the UV light to set for about two minutes. I used Beauty Secrets quick dry nail glue to glue these guys on.


I used a large nail trimmer (disinfected) to trim away any nail length I wasn't going to use.


I filed the surface of the tip and blended it to my natural nail. I used a medium grit file and was very careful not to file into my natural nail. 


I applied a very thin coat of clear builder gel to each nail and cured it in the UV light for two minutes.


I blobbed some translucent pink gel onto my nail beds extending them a bit to add length. 


I cured this in the UV light for two minutes.


I evened everything out by adding clear builder gel to the tips of my nails and up and over the pink nail bed area. I built up the middle of the nail to give them strength. Everything went in the UV light for 4 minutes to cure for the last time.


With the medium file I sanded the nails into shape and made the surface smooth. I went over all the nails again with a sponge buffer to smooth them out even more.


I got rid of the dust with a nail brush and gave each nail a coat of clear polish. I added some glitter and another two coats of top coat.


Here is the hurt thumb. Almost can't even tell it was hurt. I'll keep a close eye on this guy though. I don't like to cover damaged nail beds. It's asking for trouble. I made sure the nail was in good condition before I covered it. I kept the coating transparent so I could watch what was going on under there. Opaque coatings on a hurt nail would make ideal breading ground for bacteria and fungus. Yuck........


I'll have to sit still long enough for Maggs to decorate these.
Wonder what she'll do to me?