Wednesday, January 27, 2010

Lost Project, Worlds Best Birthday Cake


Found another documented "Making of Something".
It really is (in my humble opinion)
the worlds best birthday cake.

So much fun to make and even more fun to cut into. We got the inspiration for this project from a fabulous blog called

www.omnomicon.com

The recipe for the cake is there.
(plus many more delicious treats!)

Here I will let you see how easy it was to create.

My oldest daughter made this cake for my youngest and we all watched in amazement. It is now a family tradition and everyone asks for a rainbow cake.


Some things:

Betty Crocker white cake mix (one box for two layers)
Loads of food colouring,
(we used paste for this one but liquid works too, just use more)
cake pans, mixing bowls, wooden spoons, spatulas, mixers,
(makes LOADS of dirty dishes)
Doweling of some kind to hold the cake up
cardboard rounds to go underneath each layer
Fondant icing
Butter cream icing
rolling pin
icing sugar
oven
oven mits


Mix up your cake batter following the package directions. separate it into four or five little bowls. (The more bowls the more colours you'll have in the finished cake.) Add food colouring to each bowl until you are happy with the colour vibrancy. We tried to make rainbow colours.
Red
Yellow
Pink
Green
Purple
Orange
Blue
Accuracy doesn't seem to matter here as much as colour saturation. Make it bright.


Plop a spoonfull or two of batter into the bottom of your prepared (floured and buttered) baking pans. Add another colour onto that one, putting it in the middle of the previous colour. Keep layering like this until each pan is 3/4 full.
Don't spread 'em out. It'll wreck it!


Bake the cakes following the instructions on the box and let them cool. Cut a bit off the top of each layer to make them flat.
(Eat the trimmings!)


This is my Mom watching my oldest daughter be AMAZING!

Each layer was covered in butter cream icing and placed on a cardboard round the same size as the cake. Then Fondant was rolled out using icing sugar to keep it from sticking to the table. Roll the fondant out to about 1/4 inch thick and cover the cakes. Use the rolling pin to lift the rolled fondant sheets onto the cake. Smooth the fondant icing out with a fondant smoother or the back of a spatula. Before you pile the cakes ontop of each other insert three dowels evenly into each layer. (the top layer doesn't need any dowels.) The dowel should be as tall as each layer. Dowels and cardboard rounds keep the cake from sagging.


We used coloured fondant to decorate our cake. we rolled it out and cut shapes from it. We also sculpted it like clay.


We ran out of icing sugar and started using corn starch to stop the icing from sticking to us and the table while we were working with it.

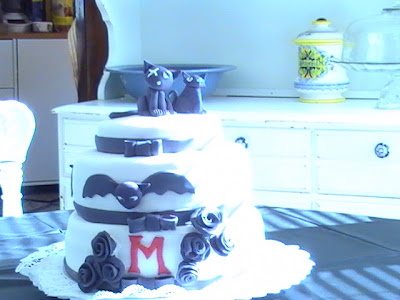


All done waiting for the party!!


Soooooooooo HAPPY!!!!!
The best birthday cake in the world!

Tuesday, January 26, 2010

Lost Project Vintage Ribbon Rose


Things I've done today:

made a huge dent in the couch with my butt
made a little cloud of dead skin cells
made a mess in the kitchen
(home made potato soup om nom nom)
made this blog!
Found an old instruction folder I made forever ago but never did anything with.
Here are the instructions


Some things:

a few yards of flower coloured ribbon at least 1 1/2 inches wide (satin or velvet doesn't matter)
fabric tac to glue the rough ends up so they don't fray
matching thread
hand sewing needle
scissors


Cut a piece of flower coloured ribbon about 8 inches long and glue the ends together so the rough edges are well hidden. Let it dry a bit.


Thread the sewing needle with matching thread (I used contrasting so you could see what I was up to) Sew 1/4 inch stitches all the way around one edge. Stop where you began but don't knot it off.


Gather the stitches by pulling the thread until the opening in the middle of the flower is about 1 inch wide. Knot it to secure the stitches.


Cut another matching piece of ribbon (or contrasting, what the heck, lets experiment) about four inches long. Glue up the ends so the rough edges don't show. Let it dry a bit.


Gather both sides of the ribbon until it's only 1 1/2 inches long. Knot the ends to secure.


The little gathered piece should just fit onto the hole in the flower middle.


Glue or hand stitch the middle of the flower over the opening.


Cut a piece of green leaf coloured ribbon about 6 inches long. Fold so the ends meet right sides together and gather up one side. You will be catching both layers of ribbon when you gather creating a seam that is gathered. Pull the gathering stitches until they are about 1 1/2 inches long.


Unfold the ribbon, it should look kind of like a leaf.


Glue or hand stitch the leaves to the bottom of the flower.


I added an extra layer of flower around the outside to make the flower fuller looking. Make it the same as the first step but don't gather it quite as much.


Add the flower to a pin back or a hair clip or a shoe or belt and enjoy.

Polymer Clay Skull Cane.


I only used black and white polymer clay for this one.
Make a cylinder of white clay that is two inches wide and one inch deep. Cut it in half using a razer and push two indentations into the flat edge for eyes.
(Ignore the little rectangle cheeky bits, I ended up not using them.)


Put worms of black clay in the pencil indentations and cover the flat edge with a 1/2 inch sheet of white. Cut a triangle shape in the middle of where the eyes are and fill it with a triangular worm. Cover this with a 1/8 inch sheet of white.


Make five or six rectangular worm shapes that are about an inch long. cover every other one in a thin black layer. Stack them together and cover any white edges with more thin black. put them where the teeth go under the nose.


Pack black pieces into the cheek area and under the teeth. try to make it be roundish when done like the top of the skull. You should have a cylinder again with a skull inside.


Cover the white sides of the cylinder with a thin sheet of black.


Squish it in the center, gently pulling to make the cane longer as you squish.


After you have it about 4 inches long you can start to roll the cane to make it thinner.


Try to maintain the same thickness all along the cane as you go. Cut the cane to more manageable lengths if you need to.


You can make it as thin or as thick as you'd like. I made mine for nail art so it's about a 1/2 an inch thick.


Finished skull cane!

If you're using this for nail art, cut the cane into three or four inch lengths and bake it at 260 for 15 minutes. After it has cooled off you can use a razer to cut it into paper thin slices. It's easier to cut if you tape the cane to your cutting surface.

Polymer Clay Citrus Fruit Canes


Some things:

Polymer clay (I used FIMO Big surprise huh?)
Yellow clay (mine was sparkly)
white clay
transparent clay (mine was sparkly)

Long razor blade (I got mine from a utility knife, be careful it's sharp!)
covered work surface
Oven
Oven mitts


Mix equal parts yellow and transparent


Roll and twist them together until they are mixed.


It takes a while, keep going until there is no marbling and the colour is even.


Make a cylinder that is about 2 inches across and one inch thick out of the new yellow you have mixed.


Cut the cylinder in half using the razor blade.


Continue to cut the cylinder into eight equal pie shaped wedges.


Roll out some white clay to about an eighth of an inch thick and cover each side of every other wedge with it. Keep the top and bottom free of white.


Push the wedges back together alternating covered and uncovered pieces.


Cover the edge of every uncovered piece in white so that the whole cylinder is white around the edge.


Roll out a piece of yellow clay to about an eighth of an inch thick. Cover the outside edge of the cylinder in a yellow sheet keeping the top and bottom faces free.


Should look something like this now.


Gently start to squeeze the middle of the cylinder. Keep the ends as even as possible as you are squashing it.


The cylinder should start to get longer. keep squeezing and pulling the cylinder until it gets about four inches long. Now you can start rolling it to make it as thin as you'd like.


Keep on rolling, cut the cane into manageable lengths as you go.


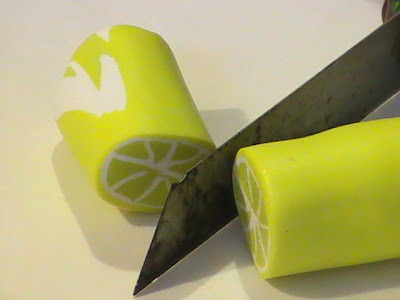
When the cane is as small as you'd like it, check the pattern by slicing off an inch or so from the edge. The pattern will become distorted more at the cane ends and remain truer to the original pattern in the center.


Looks pretty good huh?


I made limes and oranges (looks more orange in real life, lighting was a bit off) too.

If you are using the canes for nail art, cut them to three or four inch lengths and bake them at 260 for 15 minutes. Let them cool and then slice them thin as paper. It's easier to slice them if you tape them to the cutting surface.

Yeay!!!