Sunday, June 20, 2010

Purses

My Mom taught me how to sew. I must have been about four when she made this doll dress for me. Still have the sewing machine and it still works.

Need to make myself a new purse soon. Looking at some of the ones I've made might help me decide what style I want this time.
I liked this one. It was done using fabric paint on white cotton and beading some parts with seed beads. I liked the bright flowers and the gingham.

I made these as prototypes for my best girl friend's wedding. We made others in gold for the bridesmaids and one in white silk for her. We kept these two for ourselves. I loved the huge brooches we used for the clasps.

This is the magical expandable zipper purse I completed for HA Kidd and co. It is all folded and zipped up in the first pic.

This is the zipper purse unzipped. It becomes about 2x more spacious. Great shopping or traveling bag with lots of hiding spots.


The velvet skull purse also for HA Kidd and co. We used a dye remover to take the colour out of the velvet through a stencil.

They have loads of fun findings and clasps at HA Kidd. So easy to be inspired with their product.

Friday, June 18, 2010

Slightly Altered

I took off the sugar skulls and daisies, and added roses and rhinestones. I seem to be getting more comfortable at doing the 3D art with my left hand. It's getting easier every time I do it. I ran out of monomer.... so I couldn't change the colour. I wanted black with embedded roses. No time. never enough time.

They are still Martha Stewart sparkles in turquoise and pink. The white is nail polish dots. The roses are powder and liquid sculpture and the rhinestones are Swarofski.

Tuesday, June 8, 2010

3D Daisy Skull Nails and a Cat.

This is what happens when you're cat begins to feel neglected.

Changed my nails and tried to take pics but the cat kept getting in the way. He wanted to be cuddled RIGHT NOW!!!
So I stopped taking pics and cuddled.
:)


Here is a post cuddling pic. He fell asleep so I could continue.
I took off the orange dots on the smile line and added giant daisies. For a while my ring finger looked like a skull bunny. They're silly but I like 'em. The 3D flowers don't ever seem to fall off.

Polymer Clay, Forgotten Fairy Sculpt.

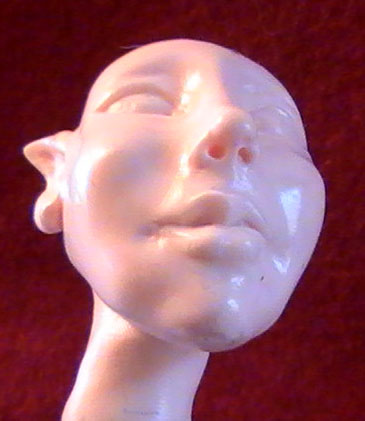
Did this sculpt forever ago as a teaching aide. It was smashed in the trunk of my car and I never finished it but there are some pretty good details in these pics so I thought I would share them with you.

Started taking pics after the head was almost completed. It was about two inches from tip of the head to her chin. I built her on a knitting needle.

There is still quite a bit of finishing to do. Here I have added a neck and blended the clay up into the head so there is no seam.

A pretty good shot of how I start my ears. Again there needs to be some more refining but it gives you the idea of where I'm going and hopefully how I get there.


I added some wire armature to support the arms. Wrapped the wire around the knitting needle to secure it somewhat. Then I added clay over the wire and started adding the torso pieces.

This is the rough in. I usually make it pretty high up. Things tend to soften and fall a bit while you sculpt and it's better to start high then have to figure out how to squish it back up if it gets too long in the body.

There, she's starting to come together here. I added some definition and curves to her arms (no hands yet) and smoothed out the whole thing a bit.

She 's looking better, almost ready to be posed before her first short bake to firm everything up a bit. The hands are added after I get most of her smoothed out and detailed after the first bake.

You can see that there are still finger prints in her back. I used FIMO classic so she would retain detail better while I was sculpting, but even it will warm up a bit too much if you're hot handed like me. You can let your pieces rest in the fridge while you take a break. it helps to stop the distortion made while you handle the piece.

Wish I had finished her. She would have been a cutie.

Tuesday, June 1, 2010

Día de la calavera de azúcar muertos uñas. (or... Day of the Dead sugar skull nails.)

My apologies to the entire Spanish speaking population of the world. I used babblefish to translate. I've always had a secret desire to speak Spanish. I love the sound of the words. One day (when I win the lotto) I'm gonna hire America Garcia to teach me everything she knows, and I'm pretty sure I'd get more out of it if I could understand what she was saying. Right now all I can understand is angry spanish. I used to have the sweetest neighbors who would argue in Spanish. They would always translate for me as the went so as not to be rude.
I miss those guys

Still working away. But I did once again manage to find time to do my nails.
:D

These ones are pink and turquoise Martha Stewart glitter mixed into the clear acrylic powder with my own Day of the Dead sugar skulls made from FIMO polymer clay.

I really like this cane and want to do it using different colours.
I added some orange nail polish dots to the smile line then clear coated the works. I'll see if I can find time to do some traditional flowers on there too using the acrylic powder mixed with eyeshadow colours.

Thursday, May 27, 2010

Commissions

I've been a busy bee. Unfortunately, I can't post about it just yet. I've been working on some commissions and don't want to spoil the surprise by telling you the details until the works are published. Just wanted to let you know I'll be back in a couple of days with some tutorials and a whole lot of enthusiasm.

In the meantime.....

I found a few spare seconds to make my toes match my fingers.

:D

Monday, May 24, 2010

White French Roses


I am beginning to think that I am the only one who likes the Stiletto nail. I made these simple white french manicure nails and added roses. Just wanted to see if people liked the flat boxy nails better than the sharp pointy ones. Let me know what you think?

Wednesday, May 12, 2010

Nail Roses......... Improvements?

I'm getting faster at these finicky roses. The more I do the easier they become. I sculpted these out of acrylic liquid and powder onto a practice nail wrapped in tape. I let 'em set up on the practice nail then glued them onto my nails. Makes it much easier to deal with the whole wrong hand issue. It's easy to do them using your dominant hand but the no dominant hand is an issue.
I made my pinkie, pink sparkles and a non stiletto just to change things up a bit.

I used a ball of white powder dipped in pink to make the petals, and a ball pf white powder dipped in green for the leaves.

Monday, May 3, 2010

I'm BEDAZZLED!!!!

Ok..... I know..... Too much bling! But I couldn't help it. Maggie was there eggin me on.
The camera is back!
I have to play with it a bit the blurriness is my fault, not the camera. Working on it.

Despite the excessive cheesiness of these nails, I really like them. Like little disco balls on my fingertips. We'll see how long they last at the day job. I give em about three hours before all the stones are off.

They are the same sparkle tips as last time. I just did a fill with the pink mix I made, removed the lemon slices and added little white flower stickers........ oh and a ton of rhinestones.

Maggs has been trying her steady artistic hand at nail art also. Here are her bedazzled nails. She still chews, but not as often because of the polish.

Her toes match her nails. So cute!


Here are my toes right now. I did them about two weeks ago. The baby toes are acrylic, I don't have toenails there so much as nubbins. The polish is pink insta dry and a white striper polish for the dots and smile lines. The bows are white acrylic with rhinestones embedded in the middle. Yeay, summer toes!
:D

Sunday, May 2, 2010

Pavlova Birthday Cake!

We made Pavlova for my youngest daughter's sweet 16th birthday party.
Here are the meringue rounds baking. 250 degrees for an hour and a half, then another half hour in the oven with the heat turned off till they cool.

We piled whipped cream and devon custard and fruit all over it in layers, then lit the candles.

Pretty pleased with the way it turned out. Not as difficult as I thought it was going to be.

We let her cut the cake. No one else wanted to wreck it. It was so pretty. Tasted like it looked. Delicious!
HAPPY 16th BIRTHDAY MAGGS!!!
Love you!
:)