Wednesday, October 21, 2015

Little G the Goblin Bowl Featured in Craft Ideas!

We are pleased as punch that our STAEDTLER FIMO Air Goblin candy bowl 
has been featured in Craft Ideas.

It was a super fun and easy project!
Hop on over to CRAFT IDEAS and try it out for yourself!

Sunday, October 18, 2015

WitchiPoo, Jimmy and Freddy the Flute from HR Puff N Stuff

James and I chose to be Witchipoo and Jimmy with Freddy the Flute for Halloween this year. James made Freddy the flute while I was a floor down sewing. He used a single piece of glitter foam and the hot glue gun. A fantastic job! His costume was a yellow, large collared shirt, brown pants and a belt and a mop wig.

 I wanted to share the prosthetic process with you.
 I do also want to mention that if you ever really want to mortify yourself and take your ego down a notch then take some pictures for a make up tutorial. Jeeze Louise! This is why you don't regularly see many pics of me on the blog.....
So...... here goes! 
Hope this helps  you Halloweenies!


I started with a clean dry face. It helps the spirit gum and liquid latex to stick if you get rid of the surface oils on your skin. Oh, it's very important to test the products on your inner arm (or some place sensitive and out of sight) just to make sure your not sensitive to the products. I used the spirit gum to glue a cotton ball to the end of my nose and my chin. (I walked around the house like this for a bit just for shits and giggles.


I gave the cotton a coat of liquid latex. It's important to use a soft paintbrush that you don't mind pitching.There is NO WAY you will ever get the latex out of the brush after. I keep the brush in the latex pot when I'm not using it so it doesn't dry out as I use it. A wet with latex brush won't stick to the cotton, but a dry one will.


I dried the latex with a hair dryer and applied two more coats, drying between coats.I added single layers of loo roll (toilet paper) torn on the edges to the top layer.


Here's the work shaped and drying. Don't try to rush this by using the hottest setting. You'll end up burning your skin. Slow and steady! Be careful!


I painted on some opaque foundation and let it dry. 


Next I brushed on a very small bit of green mineral powder. Witchipoo is a wee bit green. It's subtle. I set the whole thing by dusting it with cornstarch.


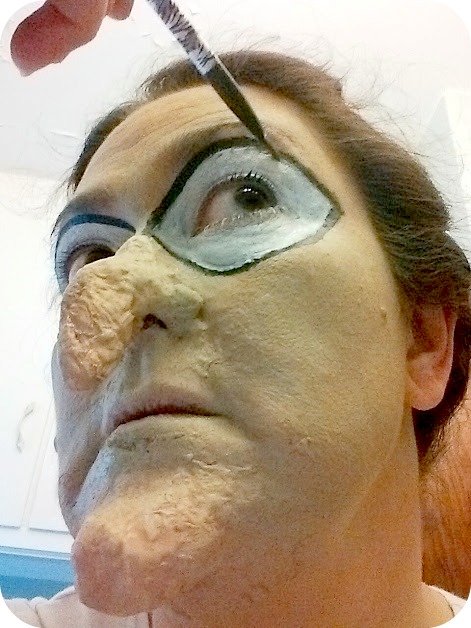
I sketched in the eye shapes with a grey liner pencil and filled the eyes in with white cream makeup.


This is cream eyeliner that you apply with a brush. It won't smudge or bleed until you take it off with remover. I have those pesky wrinkle things and have to be careful of makeup bleeding when I smile. And I smile a whole lot!   :D


I added the rosy cheeks and a tiny blush to the nose and chin.


This was the hardest part. I trimmed off a hunk of the wig at the back of the nape and used it to make her eyebrows. I already had some cream foundation on my eyebrows, so I figured it couldn't hurt to just spirit gum those bits of hair right onto my own substantial brows. Brave of me, Huh? It was fine! I used a warm soapy cloth to soak them right off after the party. Came off a treat but I did have some spirit gum remover on hand just in case. Remember to take care when using the remover near your eyes folks!


I used a STAEDTLER permanent marker to add black stripes to my red tights. 
(shameless product plug. But I do love me my STAEDTLER!!!)


Green poster paint worked a treat to make the green stripes. Painted them right on while I was wearing the tights. No need to worry about the mess of my legs after! 


I drafted a dress pattern for this one and forgot to take pics. It was a basic empire waist full skirted thing with leg of mutton slashed sleeves. The dress was made from thrifted curtains and cost a total of two dollars.


All things considered, having started only 24 hours before the party.I think it turned out well. Heaps of folks actually knew who we were! Even sang us the theme song!


Happy Costuming Folks!

Sunday, October 4, 2015

Pumpkins!

Well hello there!
I've been MIA lately. Very busy with design work and Grandma duties. There are many projects in the works for publication that I'll be able to share very soon. In the meantime, We shot out to a friend's pumpkin farm yesterday (despite the freezing, rainy, windy weather) and had a BLAST collecting our pumpkins.


Lily really enjoyed herself.


She wanted to take them all home!


The straw maze was pretty cool. Lily just turned one and has been run/walking for about a month now. She had a bit of a hard time standing up because the wind was so strong, but she managed to "drunken sailor walk" around the maze for awhile.


I think she may be a Halloweenie like the rest of us....

Happy October folks!

Monday, September 14, 2015

Pickles!

My first time in AGES making pickles. I think it went pretty well...


I didn't realize how many baby cucumbers are actually in a bushel.... 
As a result.... 
I have about a three year supply of pickles now.
Wonder if pickles are an acceptable stocking stuffer?

Wednesday, September 9, 2015

Pears...

It's that time of year again!
I love this time the best of all. The weather calms down to a gentler cool. The food is so much more comfortable too. Baking starts again after the bbq  and salads of summer. We were gifted some beautiful organic pears again this year. I think they may be one of my favorite fall harvests.


We made some delicious pear and caramel pie. I cut up the Werther's chewy caramels and added them right on into my regular pear pie recipe. Sooooo delicious!


We even had enough to can a few. We added cardamom pods and star anise. That should be good and warming in the winter months. Maybe over some vanilla pudding cake.
Mmmmmmm.....


Good thing Lily's grown some chompers so she can have some fall baking too!

Monday, August 31, 2015

WINNERS!!!!

SWEET SUMMER GIVEAWAY Winners are...........


We decided since there were only six contestants this year.....


That they would ALL WIN!!!

Sooooo

sisylyn2
Emily C
Melissa
Lindsey
Vic Wilson
Sarccino

Please go to my contact page and email me your mailing details so I can get these fantastic kits out to you asap!!!


Congratulations!

Can't wait to see what you all come up with!

Sunday, August 16, 2015

STAEDTLER Lily Fairy Doll Make

I made up a Lily Fairy doll so I could send the instructions out to the contest winners, but decided to post them here so you could all see how easy (and fun) it is to create a doll using this fantastic STAEDTLER mold.

I changed the feet included in the mold because I wanted my doll to have curled, striped stockings on.

Monday, August 3, 2015

Sweet Summer Giveaway!


We've been very excited to announce this special summer giveaway!


of our blog followers will each receive a Lily Fairy kit containing....


12 half blocks of various STAEDTLER Fimo flesh tones.....


Contest rules and regulations:

GIVEAWAY CLOSED!!!!

To win, you must follow this blog
You must leave a comment on this post.
You must live on the planet earth.

Contest winners will be drawn on August 30th 2015.
Draw will be announced on Monday Aug 31st, 2015.
You've all got another day to follow and comment!!!

Good luck!!!

A HUGE thank you to STAEDTLER for sharing these kits!!

Now, join and comment!!!


Saturday, July 25, 2015

Bedroom Floor Posies

We are forever renovating the house. With all the family changes going on around here the rooms are constantly changing functions. After 15 or so years, Mom has flown the coop and is enjoying her own space in her own flat. That left her upstairs room vacant. We have been slowly decorating and changing the space to meet our needs as a master bedroom. We've painted the once chocolate brown walls to a warm cream, we've primed the floor and added a decorative one stroke rose and leaf pattern with some beautiful paint (Thank you cousin Lindsay!!!)


Here is a closer look at the floor design. It was hard to stop making these rose sprays. I kept wanting to add more clusters and it very easily could have ended up like a bad hair cut. Adding more clusters closer together around the room until there was no more open space..... I stopped while I still wanted to add more. I think there are just enough now.....


Here's a shot of Lily on the floor to give you a spacing idea. (and to show you how cute Lily is playing on the new floor!)


We've added two coats of water based semigloss varnish and some trim to finish the room off. The varnish yellowed the floor a bit and thicker areas of varnish went almost caramel, but I really like the aged look it gave the room.


We got these gorgeous paints from The Painted Peacock in London Ontario. They are made by a company  called Homestead House Paint Co.... Fusion paint is the perfect choice for finishing furniture with almost no prep work and a built in top coat, but I fell in LOVE with the colours. I knew they would work well with a one stroke rose and leaf for the bedroom floor. We wanted something that looked like it had been in the house for years. We didn't want anything too bright or new looking.


Here are some of the colours available. They also offer a line of furniture finishing and re-finishing courses that are extremely economical and informative. Please do stop by The Painted Peacock at the London Market and say Hello from us!


Wednesday, July 1, 2015

Painting the House


We've had our hands full lately with work and grand baby and minor decorating. I got my hands on some gorgeous paint made by a manufacturer in Toronto. (Thank you cousin Lindsay!) More on the paint later.


There will be so many more posts coming. Some posts about renovating, some about new publications, still more exciting posts about a fantastic giveaway.... Been planning this giveaway for weeks! You're going to LOVE it!!!


It's Canada Day! We celebrated by having some delicious red and white pancakes. Love it when our local strawberries are ready!