Sunday, December 29, 2013

Food Labels with PicMonkey

I used the PicMonkey upgrade that I won at Halloween to help me make some of our Christmas presents and thought I'd share how they turned out.
James got some home made hot chocolate mix. Here's the recipe I used. It's delicious and really fast to mix up. I use this pic of James for everything. It's my favorite. 


Here's Maggie's hot chocolate mix label. She looks a like a little devil so I went with it.


Mom got some instant coffee with ground up candy canes in it. 


I used a pic my brother altered a long time ago to make his coffee label. He's replaced Dean Martin's face with his own and it looks like he's telling Frank and Sammy the best story ever told. 

We've had a quiet holiday.
Hope you've all had the opportunity to share some of the season with loved ones. 


Sunday, December 22, 2013

Lemon Poppy Seed Glazed Cookies

We're almost done the Christmas baking for another year. Working retail, it's hard to find the time (or energy) to get things done this time of year. We are getting there though. I think these cookies are the top of the heap this year and I wanted to share them with you. We made ours star shaped and added some gold sugar balls to bling them out a bit.

I found this recipe from Freshjuice.ca through my PC Plus recipes. I think they're going to be a new holiday favorite. They are the most lemony cookies I've ever tasted and the poppy seeds give a pleasant texture to these delicate biscuits. 

Hope you try them to!

Sunday, December 15, 2013

Christmas Concocting.

The Nuts and Bolts have a smokey twist thanks to President's Choice Black label Smoked Paprika. I'm going to put this stuff on everything! We used Martha Stewart's Nuts and Bolt recipe but we left out the traditional O shaped cereal. It gives James a stomach ache. Anyone else sensitive to O's?


The kids have been busy constructing a Gingerbread Bunker. Maggie's superior skills with filling gaps with mini marshmallows and royal icing and Austin's tree building prowess have made this year's gingerbread build a huge success! Love the melty snowman by the tree!

It's been a lazy sort of weekend around here.
Hope you're finding loads of family time too!

Saturday, December 7, 2013

Booze Filled Chocolate Santa Heads

You totally read the title right!
Thought I'd share this one for any of you who are looking for something extra special to make for that person who has everything. I made some booze filled chocolate Santa heads using a mold  made from the Retro Santa created for this December's issue of PolymerCafe magazine. I couldn't resist making a copy of the Santa head before I painted and assembled the piece. I used a food grade mold putty so I can totally use it to cast chocolate. It's also bake-able..... wonder if there are some Santa head cookies in my future?


Sunday, December 1, 2013

Icicle Ornaments

I'm knee deep in Christmas gift making. Just came up with these icicle ornaments for the tree and thought I'd share.


Saturday, November 30, 2013

Mini Food

 It was only a matter of time before I made mini food. There are so many talented folks making wonderful tutorials. I don't think I need to add my version. Not re-inventing the wheel here folks, just sharing what I've been up to. Hope you'll give it a try. It's somehow relaxing, this mini food making. I used STAEDTLER Fimo clay, varnish and Karat Soft Pastel Chalks.

My version of a cheeseburger. I've included a quarter in the background to give you a bit of a size reference. I forgot to add bacon and pickles to my burger, but I did include a hole on top to insert an eye pin so I can hang the wee food as a charm.


Some teeny beef tacos. I've included tomatoes and cheese but forgot to make guacamole and onions. Next time. 


I think these are my favorite. Little baloney sandwiches. What would you use mini food to decorate? Would you make napkin rings? Pendants on necklaces?  Charm bracelets?

Monday, November 25, 2013

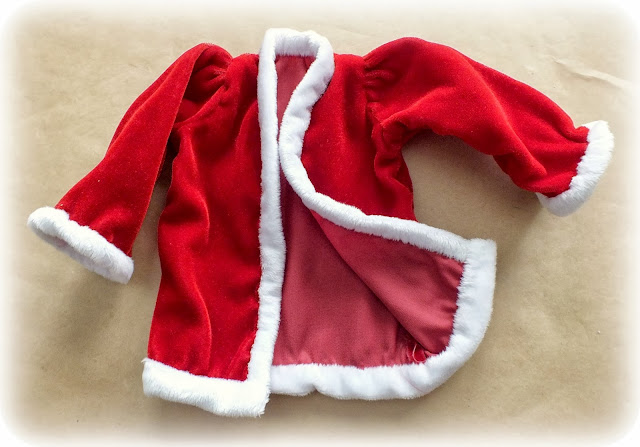
Father Christmas' Cloak

 
Here is the last of our Santa's Wardrobe patterns. The instructions for this fully pose-able STAEDTLER Fimo Puppen Santa can be found in the December 2013 edition of PolymerCafe magazine. Pick yours up by following this link.


I used exactly the same pattern as I did for Santa's Shirt and Santa's Short Jacket to make this cloak.
I lengthened the front and back bodice pieces so the cloak would reach the top of Santa's boots. I also added a hood to the coat. I measured around the neckline of the jacket and up and over Santa's head from one shoulder to the other to get the measurements for the hood. I added the hood pieces before I trimmed the cloak with fur using the same technique as the short jacket and cap. 

I also added a great deal of trim embroidery around the border of the piece. I used DMC floss with some glittery accent floss mixed in. I also added some green and red seed beads to the embroidered edges for some more glitter. I found teeny jingle bells to use a buttons and added those up both front edges to finish the piece off. 

Wishing you and yours the happiest of holidays. 

Wednesday, November 20, 2013

Deer and Spaceman Iron on Transfer Portrait Dolls

This is a very special couple. They are expecting their very first baby. Mom to be is very DEER to us (Huh, See what I did there?), and although we are still getting to know Pop, I think he's a pretty fantastic kind of person too. We simply had to do something to commemorate the event. We decided on Mom and Pop dolls for the baby. These dolls are fully washable and all parts are firmly sewn on for the baby's safety.  Iron on transfer paper for T-Shirts was used to make fabric replicas of the smiling faces new parents to be.

Wednesday, November 13, 2013

A Christmas Deer Brooch

Had a great night last night crafting with family. Made this little guy for Mom from STAEDTLER Fimo effect clay. I love the metallic clay in copper and gold, and the glitter clay in green and red and white are fabulous accents to any Christmas project. I even used one of their little heart push molds for the dangle. Have you started your Christmas gift crafting yet?

Sunday, November 10, 2013

Remembering

This is my Grandpa, my Great Uncle Walter and Great Uncle Benny doing their thing. Dashing young men giving up a bit of themselves so we could have a bit of freedom. 
Thank you doesn't seem like enough, does it?

Friday, November 8, 2013

Our Gingerbread Folks are in Crafts 'n Things Winter 2013

This is a project packed issue of Crafts 'n Things magazine. We've got our little STAEDTLER Fimo gingerbread folks instructions tucked inside. They are made using a pretty cool new flooding technique using our favorite polymer clay!
Grab your copy today and check it out!

Tuesday, November 5, 2013

Santa's Short Jacket

Here's The short jacket pattern for our STAEDTLER Fimo Puppen Retro Santa featured in the December 2013 issue of PolymerCafe magazine. You can find the rest of the patterns by following the link in the sidebar.

We used the same pattern for the jacket as we used to make the shirt. Following the steps in the shirt post here, will help you to draft a jacket pattern if that's all you need.

Friday, November 1, 2013

Santa's Cap

Here's another clothing pattern for our STAEDTLER Fimo Puppen Retro Santa featured in the December 2013 issue of PolymerCafe magazine. You can find the rest of the patterns by following the link in the sidebar.


Thursday, October 31, 2013

The Castle Lights are Growing Dim.......

Here's our Halloween trick or treat night in a nutshell. 
It was soooooo rainy and windy but we still had loads of kids!
It was great fun!

Monday, October 28, 2013

Frankenstein and his Bride Costume Build


This year James and I were Frankenstein and The Bride! Thought I'd share how we got the costumes thrown together. It was the BEST year ever! So many creative ideas and fantastic costumes..... Don't know how we're going to keep up next year.

Tuesday, October 22, 2013

Santa's Trousers, Pattern and Instructions

This Santa is created with STAEDTLER Fimo and Puppen Fimo and is featured in this winter's PolymerCafe Magazine. 
As promised in the issue, here are the instructions a pattern for his trousers. His jacket, cloak and cap will follow with full tutorials of their own.

I'll help you through pattern drafting process as well as fitting the wee clothes to your doll.

Sunday, October 20, 2013

A Dress Shirt Pattern for Santa

This jovial fellow is created with STAEDTLER Fimo and Puppen Fimo and is featured in this winters PolymerCafe Magazine. 
As promised in the issue, here is the first of his outfit pattern posts.

I'll try to help you through pattern drafting process as well as fitting the wee clothes to your doll.
Please use the comments section at the bottom of each clothing post to ask questions. I'll be on daily to help you all through the process. 

I made the shirt pattern in the middle of my body construction. Before I added the head permanently. It's much easier to make the pattern and dress the doll without the pesky head getting in the way. Stretch the arms out sideways and lay the doll on some brown paper. Trace around the dolls body giving about a 1/4 inch on all sides to make sure there is enough fabric to wrap around the body. We'll add a seam allowance later.

Saturday, October 19, 2013

Our Retro Santa is a Cover Boy!

I know we're in the middle of Halloween preparations, however this couldn't wait!

I'm pleased as punch to announce that our Retro Santa made with STAEDTLER's Puppen Fimo has made the cover of PolymerCafe magazine for December 2013!

Follow the link to grab your copy and stay tuned to this blog to get step by step instructions on pattern construction to make his outfits. 

Yes there are two outfits!!
One long coat and hood for a Father Christmas 
and one cap and jacket for a traditional retro Santa Clause!

The shirt will be up next week and the other clothing items will follow weekly so you can have your own little classic Santa ready for the Holidays!

Sunday, October 13, 2013

#PicMonkeyBOO Halloween Contest!

The prize is a years worth of their advanced photo editing tools. It's a free Royal membership for a year if you win!

Here are some of my entries. 
I'm having a ball with these tools.


Myself as a ghoul....

Saturday, October 12, 2013

Mummy Hand Tutorial

This is a really great way to pre-make some bandage wrapped hands for a costume, so you won't have to take time from your makeup on the event night to wait for the glue to dry....

I used some of our torn cotton sheet sets for this. I cut them into roughly 1 -2 inch strips. I started wrapping at my fingertips and worked my way down each finger. I used Fabri-tak fabric glue from Beacon adhesives because it has an amazingly fast grip.

Wednesday, October 9, 2013

Upside Down Apple Pie Cake

We've been completely swamped with seasonal projects these last few weeks. I'm finding it hard to keep up. We were gifted some delicious apples last week and are trying up new recipes to use them all up. 


This happened. We cooked up some sliced apples with cinnamon, sugar and pear syrup until they were a golden brown. Then we mixed up some plain cake batter and poured it over top the apples and baked it just like that.

I highly recommend this! The cake was sooooo moist when we turned the cake out the apples soaked right into the soft hot cake. We ate it all before it even had a chance to cool.
Do you have a favorite apple recipe?


Wednesday, October 2, 2013

The Creature

Here's a fast step by step on how I use my STAEDTLER Karat Aquarel watercolour pencils. I'm continuing on with my Monster theme for the season, but you could use these techniques with any subject matter.


I start by sketching out my basic design on a dry sheet of watercolour paper. After I get the design straight I can use a wet brush to blend the outlines. I scribble some of the colours I want to use onto a scrap piece of watercolour paper and call it a pallet. I can use my damp brush to pick up some of this scribbled colour and add it to the piece. 


Here's the creature with most of the work done.


I scribble background colour onto another pallet paper and wet my whole background down with plain water. Then I add some of the scribbled background colour and watch it run.


Background done!


Lastly, after the piece has completely dried, I use my STAEDTLER pigment liner 0.5 to outline the detail and sign the piece.

Hope your having a fabulous fall so far!!! 

Sunday, September 29, 2013

The Bramble

We made these jelly shots for a family get together this weekend and I'm in love with them. I'm also smitten with the whole idea of gourmet, alcohol enhanced jello bites. I think it might be a new hobby.


These are called Brambles. They have a bottom gin and lemon layer and a top blackberry layer. You can find the recipe over at the JellyShotTestKitchen.

This is our first attempt about six months ago. Unfortunately, I spilled most of the gin layer on the kitchen floor so it's almost non existent here. They were still delicious. The yellow jelly with the grapefruit is the Paloma from Jelly ShotTestKitchen.  It had a bitter bite and I'm a sweet toothed gal, but it was another great recipe from the same site.

Do you have a favorite "bring to the party" dish for Halloween?
We'd love to hear yours!

Thursday, September 26, 2013

Here Comes The Bride!


Couldn't resist a little classic monster fun. She might be a card or some gift wrap when added to a soon to come group of old timey ghouls. 


I used my STAEDTLER Pigment Liner 0.5 to outline the design and highlight the details. I'm having a ball with this years Halloween designs. There'll be more to come soon!

Tuesday, September 24, 2013

Halloween Watercolour

I've been playing with my STAEDTLER Karat Aquarell watercolour pencils. Thinking about some seasonal cards and decorations. Here's what we've got so far.

I'm thinking about table settings and maybe some pop up cards. 


The banners should be great for table settings, maybe scrawled across mini pumpkins? 


I have plans for pop up cards using this wing and some photo transfers on STAEDTLER fimo clay. 
I'll let you know what happens.
:D


Saturday, September 21, 2013

Zucchini Pear Quick Bread


This recipe makes two proper large loaf pans of bread plus one small round cake pan.
The small round cake pan comes out first and is usually devoured by the time the larger loaves come out.

Preheat oven to 350 degrees
Oil and flour your pans and add parchment paper liners if you like them.
We started off making this recipe for Mom's Zucchini Bread but doubled and altered it to suit our tastes.

Ingredients:

Dry ingredients:
5 3/4 cups of white flour
3 tbsp ground flax seed
2 tsp salt
2 tsp baking soda
2 tsp baking powder
6 tsp cinnamon
2 cups of chopped pecans or walnuts

Wet ingredients:
6 eggs
2 cups of veg oil
4 cups white sugar
1/2 cup of brown sugar
4 tsp pure vanilla extract (or the scrapings from one large vanilla bean)
3 1/2 cups of grated zucchini
1 cup of grated fresh unpeeled washed pears
1/2 cup of chopped apricots

For topping:
1/3 cup of unsalted, shelled pumpkin seeds


I mixed all the wet ingredients together in a bowl. Sometimes I add substitute carrot or apple. Sometimes we add raisins or currants... It depends on what we happen to have a heap of. 


I mix the dry ingredients up in a separate bowl. I use walnuts or pecans, but you could use any nut you happen to have. I've also added bran to this recipe along with the flax seed. Remember to reduce the flour if you increase the flax or add bran. I figure I can always add more flour at the end of I need it.


I butter and flour the loaf pans and add a sheet of parchment paper that overlaps the sides of the pan to make taking the loaf out easier.

I mix the wet ingredients into the dry ingredients. Make sure you are using a super big bowl. This is a heap of batter! Just mix until the ingredients are blended. Some lumps are ok, you don't want to over mix!

Pour the batter in the bread pans and put the left over batter in a smaller pan. Now is the time to sprinkle the loaves with seeds or toppings. I bake all three together but take the smaller pan out after about 30 minutes or when a knife comes out clean. The larger loaves will bake from 45 minutes to an hour. Use the clean knife trick here too.


Here are two loaves without seed topping.....


And here are two loaves with the pumpkin seed topping.
They are both delicious.
Hope you try your own version.
We can't seem to keep this in the house. It gets eaten almost as fast as I can bake it.