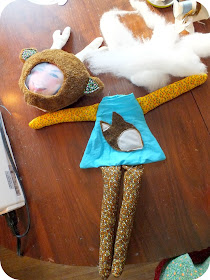
This is a very special couple. They are expecting their very first baby. Mom to be is very DEER to us (Huh, See what I did there?), and although we are still getting to know Pop, I think he's a pretty fantastic kind of person too. We simply had to do something to commemorate the event. We decided on Mom and Pop dolls for the baby. These dolls are fully washable and all parts are firmly sewn on for the baby's safety. Iron on transfer paper for T-Shirts was used to make fabric replicas of the smiling faces new parents to be.
I decided out how big I wanted the dolls to be and made the face transfers to reflect the size choice. I figured the dolls should be about 20 inches long..... that would make the faces about three inches tall. I used Picmonkey to help me edit the edges of the photos to black focusing in on the couples smiling faces and eliminating all background detail. I ironed the faces onto some cream coloured broadcloth following the manufacturers instructions. I was lucky that this Mom happens to own her own photography business and has heaps of pics of herself and her hubby for me to choose from.
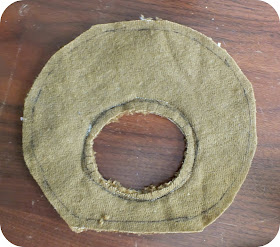
I made two donut shapes from paper. I wanted these pattern pieces to frame the faces. I knew I wanted Mom to be a deer but didn't settle on the Pop astronaut until later. His donut will be a helmet and hers will be a fur hat with ears and antlers. I will add a 1/4 inch seam allowance to all pattern edges when I trace them onto the fabric.
I made the body and an arm/leg patterns in sizes that made sense with the head pieces. I trimmed the spaceman's body rounder than the deer's dress.
I used my STAEDTLER permanent markers to trace the head pattern piece shapes onto the back of some deer coloured fun fur. I cut the face hole from one head shape and left the other solid.
I cut a head shape with a face hole from a piece of mini floral print cotton in matchy tones. This piece will line the face. You'll probably only see a wee sliver of it on the finished doll. Pin the two head pieces with face holes together right sides facing.
Stitch around the face hole using a 1/4 inch seam allowance and clip to the seam every 1/2 inch or so to make turning easier. You can see my 1/4 inch seam allowance here.
Flip the piece right side out and place over the face transfer to see how it fits.
I made some ear templates and cut four from the fur.
I cut two smaller ear pieces from a teeny floral cotton and sewed the smaller ear shapes to the larger ones. Then I pinned one plain and one floral ear shape right sides together and sewed around the edges using a 1/4 inch seam allowance. I clipped and turned the ears.
I made antlers the same way out of some cream coloured broadcloth and stuffed them.
I tucked the ear and antlers onto the face and layered the last solid head fur piece on top of everything. I made sure the edges of the ears and antlers were going to be caught in the seam.
I pinned the pieces together in this order.
1. face transfer (good side up)
2. sewn head piece with face hole (Fur side up)
3. ears and antlers
4. last fur head piece no face hole (fur side down)
I sewed around the head from the left neck opening to the right neck opening. I left at least a two inch opening at the bottom of the head to turn and stuff the piece. I made two passes over the areas where the ears and antlers were layered between the seams.
Clip the edges and turn the piece right side out. Stuff it with some fiber fill.
SOOOOO CUTE!!!
I cut two body pieces from turquoise broadcloth. I decided to applique a deer head onto the front of the dress. This seems to be a very popular shape on the world wide interweb these days. I was greatly inspired by this pattern and hope you'll all skip on by for a gander at her wonderful patterns. What a fantastic website, and I must admit that I'm smitten with the deer head on the dress. I stitched around the shapes with the machine to secure them to the dress. Since this is for a baby I really don't want there to be even a teeny chance of anything coming off. Please make sure all decorations are permanently attached.
This is perhaps the hardest step. I cut out two arm shapes and two leg shapes and stitched around the edges leaving the top of the arm and legs open for turning and stuffing. I used a 1/4 inch seam allowance again. (The only difference between the arms and legs is, the legs are one inch longer.) I stuffed the appendages and as with the ear and antler pieces I lay them on the body piece where they would naturally protrude. I then one by one, turned the pieces so the top of each met the outside edge of the body. Next I sandwiched the top of the body over the arms and legs and pinned the edge in place. I left the neck hole open and that's where the too long arms and legs stuck out while I sewed around the body edge. I gave the areas where the arm and leg tops were sandwiched and extra couple of hits with the sewing machine just to make sure they were secure.
Turn the body right side out and voila! You've almost got a doll! Stuff the body and hand sew the head on.
I added a ribbon the hide the neck stitches and sewed the ribbon in place. I also stitched a nose and eye onto the deer applique on the dress using two strands of embroidery floss. I don't like using sew on eyes or beads on baby toys.
Follow the same instructions to make the spaceman. He's a bit easier though. No antlers or ears to deal with.
Can't wait until I get to meet the baby!
Hope he/she gets as much fun from these dolls as I did!
Heaps of love!
Don't forget to visit Kitchy Digitals and show them some love too!
Sew many adorable patterns!!!!
;)
Don't forget to visit Kitchy Digitals and show them some love too!
Sew many adorable patterns!!!!
;)


No comments:
Post a Comment
Thanks for the note.