Wednesday, November 28, 2012

STAEDTLER Fimo Effect New Colour Sneak Peak

I've been a lucky girl!
I've been sent some of the new colours from
STAEDTLER's fimo effect line to preview. They won't be available until late 2013 but I just had to share them. I'm in love with these yummy new pastels with a translucent base and a metallic shimmer.
.

I took these pics in the evening with very little light. I might have rushed things a bit but I was eager to show these new colours off! I'll take more shots soon and share them as I get them.

I've glossed over the beaks of each owl so you can see how the clays react to glossy coatings and matte finishes alike.

has a beautiful iridescent colour shift floating in an almost periwinkle coloured clay.


is really a believable chilly icy colour when cured.
It's hard to believe something that starts out almost chalky will cure to such a gorgeous translucent shimmer.
I've tested this colour before HERE.


is a fresh clear sunshine yellow with a pearl colour shift.


wow! This is probably my very favorite.
This colour cures into a stunningly beautiful translucent mid green with a gold colour shift.
I'll be using this one heaps.


is so very delicate looking. 
The translucent pink base reminds me of flower petals that let the light filter through them. 
This clay has a pearl shimmer throughout.


is delicious. 
It's a deep red translucent clay with an iridescent shimmer peeking through it.


is a showstopper.
When cured it turns a deep blue black and somehow lets the glitter and shimmer of thousands of stars gleam through.

I'll be doing more colour test shots over the next few weeks to show the depth of colour these new clays have. Stay tuned for more details and more pictures.
Now I just need some sun!

Saturday, November 24, 2012

Here Comes the Snow and More Glitter.

Thought I'd share some of what was going on today!

Here is a quick pic of the new glitter polish by Joe Fresh!
This is only two coats of gold glitter and a brush stroke of silver across the left corner of each nail.
I'm in love with these glitters. They are almost opaque with one coat!


We were hit with the wand of the snow fairy today for the first real covering of the year.


It's so pretty!
Making me wanna decorate.
Do you have any seasonal merriness up yet?

Tuesday, November 20, 2012

Plain Gel Nails

I've posted on my techniques for acrylic nail building but haven't done much show and tell with the gels. I thought I'd share how I do my basic gel application using tips.
Hope this answers some of your questions.


This is what I start with. Clean, trimmed nails that have been slightly scuffed. 
It's not pretty folks.


Here is my bruised thumb. I got it stuck in the automatic doors at work last month. There hasn't been any damage or de-formalities on the nail. Just the underneath bruise.


I fit all the tips to my nails and lay them out on a clean surface in order of appearance.


I base coated my nails with some bonder and stuck them in the UV light to set for about two minutes. I used Beauty Secrets quick dry nail glue to glue these guys on.


I used a large nail trimmer (disinfected) to trim away any nail length I wasn't going to use.


I filed the surface of the tip and blended it to my natural nail. I used a medium grit file and was very careful not to file into my natural nail. 


I applied a very thin coat of clear builder gel to each nail and cured it in the UV light for two minutes.


I blobbed some translucent pink gel onto my nail beds extending them a bit to add length. 


I cured this in the UV light for two minutes.


I evened everything out by adding clear builder gel to the tips of my nails and up and over the pink nail bed area. I built up the middle of the nail to give them strength. Everything went in the UV light for 4 minutes to cure for the last time.


With the medium file I sanded the nails into shape and made the surface smooth. I went over all the nails again with a sponge buffer to smooth them out even more.


I got rid of the dust with a nail brush and gave each nail a coat of clear polish. I added some glitter and another two coats of top coat.


Here is the hurt thumb. Almost can't even tell it was hurt. I'll keep a close eye on this guy though. I don't like to cover damaged nail beds. It's asking for trouble. I made sure the nail was in good condition before I covered it. I kept the coating transparent so I could watch what was going on under there. Opaque coatings on a hurt nail would make ideal breading ground for bacteria and fungus. Yuck........


I'll have to sit still long enough for Maggs to decorate these.
Wonder what she'll do to me?

Sunday, November 18, 2012

Sparkly Star Ornaments

Some fun and easy sparkly star ornaments made with STAEDTLER fimo.
These materials will make ten 3 to 4 inch ornaments and are a snap to make. A great project to make with children for teacher gifts


Things you'll need to complete this project:
Recollections fine glitter in glitz or an iridescent fine glitter of your choice
White craft glue
Ribbon to hang the stars

Tools used to create this project:
Clay roller
Parchment paper
#4 flat paintbrush
3 or four inch star cookie cutter (only for use with polymer clay)
Medium grit sand paper or nail file
Drinking straw


Condition or soften the clay by kneading it in your warm hands until it's workable.
Roll the clay out onto a parchment paper covered work surface. I rolled my clay out to about 1/4 inch thick. Cut out your stars and use the drinking straw to make holes in the tip of one of the star tips for hanging.
Bake the stars for twenty minutes in a preheated 230 degree oven on a parchment paper lined baking sheet.


After the stars have cooled off, use the sand paper or nail file to smooth out the edges of the stars.


Coat the stars with a thick layer of white glue and sprinkle liberally with the iridescent sparkles. I coated and sparkled one side at a time and did the edges last. You will be able to see through the sparkle layer to the original clay colour. It makes a cool double glitter effect.


Here are my ornaments all packaged up and ready to send away. These guys really catch the light.


Wednesday, November 14, 2012

Copper Metal and Fimo Beads

My Grandpa George used to wear copper and every time I see copper jewelry I think of him and smile.
He was pretty awesome. One of the many things he taught me was to have the patience to wait for good things. He taught my brother, our cousins and I, to fish. (There are quite a few of us.) He would get up at an ungodly hour (6 am is ungodly when your on summer vacation and your 9 years old) and he would make a heck of a racket getting his things together (to make sure we heard him and we would race to catch up with the big man). After we all clambered into the boat with him he would mock grumble about always having to take the rotten kids along.....  I never bought it..... he smiled far too big when we caught a fish for me to believe that he didn't want us with him.
I really really miss that guy.

I purchased all my copper metal chain and extra bits from gemplus24 . They had great prices and I'm happy to say their service was speedy quick and they sent exactly what I ordered.
The beads I made from scrap STAEDTLER fimo
I made a worm of all the left over clay I had lying about and covered the outside of the worm with a sheet of black. I cut 1/2 cm slices of the worm and shaped them into little square tiles. I pushed a hole into each with a needle tool and baked them for 20 minutes in a preheated 230 degree oven.


I coated each bead face with some STAEDTLER fimo gloss varnish to bring out the colours.


I did some wire work through each bead and created an eye at the top and bottom of each bead to attach the chain.


I used a split ring to attach the chain to each side of the wire. I added the beads at random spots on each pre-measured chain bit. The chains were just the right length to go around my wrist tightly not including the length of each bead.


I added a split ring to each end of each beaded chain and looped them all together through another split ring.


Then I added a lobster claw to one end and some beads on a decorative head pin to the other as a finishing dangle.


Here he is.......
Still fishin'


Tuesday, November 13, 2012

Christmas Poster Designs with STAEDTLER Marsgraphic 3000

It's beginning to look a lot like Christmas around here.
We've even had a dusting of snow.
It's time to start planning parties and making cards and invitations.
I've been doodling out some designs with my STAEDTLER marsgraphic 3000 layout markers.
They're pretty easy to use. They have two working ends. One fine point and another brush tip.
The colours are pigment packed. I love playing with them.


This ended up being a poster for a work party, but it playing with my layout markers sure did get me in the mood for some festive card making.
Have you guys started yours yet?
What colours are you using this year?

Saturday, November 10, 2012

Remembering............

Maggie and George


Miss you both.

Sunday, November 4, 2012

Needle Felting a Rat.

Auntie J and Mom brought us a load of needle felting supplies in the summer. Maggs has been felting up a storm, but I haven't had a chance to make anything with it until this weekend.


Here's what I got!
A little white rat!


I didn't take very many early construction photos because I wasn't sure it was going to be anything worth documenting. This is the first pic I took. Most of the body is constructed of felted balls. I poked some flexible wire through at the arm and leg spots and covered the wire wool and felted it. I did the same for the tail.


I curled the ends of the wire into loops and covered them with pink felt to make little paws.


I felted the center of two little flat bits of wool.


Folded them in half and felted some more.


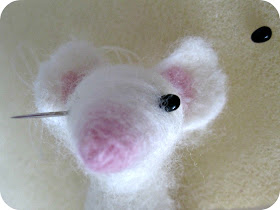
I added a wee bit of pink to the inside of each. They're ears!!! This is soooooo much fun and way too addictive!


I attached the ears.


I found some teeny black teardrop beads in my stash and sewed them into the head.


I tightened the threads to sink the eyes into the face a bit. I cut off the extra thread and felted a bit of white wool over the thread exit point at the back of the head.


I added a bottom jaw.


I wrapped some pink wool around the pointy tip of a wooden skewer and felted it.


These little pink worms made excellent thumbs!


Have you tried needle felting yet?